Grow your own: Oregano

Herbs are part of the produce you can grow in any tiny space you have available, I have explained in an easy way how you can start your own corner of nature even in a small area here and now would like to proceed with the use of some of the plants you can grow both in urban situations and in the country.

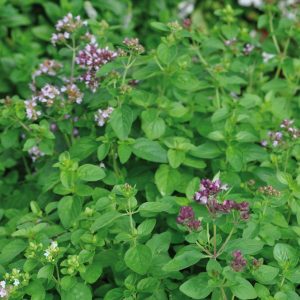
Oregano (Origanum vulgare) is one of my favourite herbs, it is a perennial herb, and like many of them it will need a sunny warm spot, possibly close to a wall that gets loads of sunshine if you live in a colder climate. You can buy the seeds and started indoor between February and March, or just buy a small plant in a nursery. Water it often, but not too much as the roots tend to rot, plant it in a well drained pot or area of your garden. To have the most flavour from your origano, pick leaves in summer before it flowers. You can eat them fresh or dry it by cutting the whole stem and hanging a bunch upside down in a shady but well ventilated place, ones dried you can preserve it in small paper bags or in a glass jar. Oregano is not limited to consumption though you can use it to decorate borders in the sunshine, it is very fast growing and has a lovely shape and flowers too, it is very nice if you aim at having a perfumed garden.

The myth on the origins of oregano starts in Cyprus, where a young gentle man names Amaraco (in Spanish it is how Origano is named) lived. One day he was given the chore to bring a small bottle of very perfumed oil to the king. The king wanted to impress guests he had for dinner with the lovely scent, but while walking with the bottle, Amaranco tripped and made it fall while entering in the room. Such was the young man’s despair that he instantly dies of a broken heart. The Gods seeing this where so moved that they transformed him in a lovely plant that scented as beautifully as the oil he had spilt.

The name Oregano come from an ancient greek term “Oros” that means mountain and “ganos” that means delicious or splendid. A plant of many virtues Oregano has a long medical and natural history with men, it has been used in China to treat fever and in Europe for facilitating digestion, make cough a little better and lower fever. It used to be burned during the plague with mint and thyme in the hope it would purify the air (that did not go to well did it?!)

Recipe: Courgette & Oregano savoury Cake

In Italy and in the rest of the mediterranean world, oregano is not used only on pizza, it is used on many other types of food. You can use it to season focaccia, to season omelette lamb, frittata and make amazing spaghetti.

Ingredients: 800 gr of Courgettes, 250gr of arborio rice, 4 eggs, 80 gr of grated parmesan cheese, 1 minced onion, 4 spoons of olive oil, 20gr of bread crumbs, 2 tablespoons of oregano, butter, salt.

Clean and cut in small round slices the courgettes, mince the onion very well and put in a warm pan with the oil for 15 minutes. In the meantime make the rice boil until half its due time (for example, if on the box there are 15 mins, make it cook in boiling water for 7), then drain it from water and add it to the courgettes with the breadcrumbs and let it cook on the pan for further 15 minutes. In the meantime put the eggs together in a container and mix them well with salt, pepper and cheese and the oregano. take the pan out of the fire add the eggs, mix quickly and then pour all of this in a cake tin (that you have buttered before)  and let it bake at 180C for 15 minutes.


Patio Produce: digging for victory in London

I admit it. Writing this is not easy as it seems!
I LOVE GARDENING.
I enjoy it so much that when I lived in Italy I took night classes to become European licensed  garden designer and have refurbished some gardens in Italy and more than a couple in London in my spare time from work.
So writing just a little on the subject is hard! Since moving to the U.K. I have even understood why so much of the population here love it. With this climate it is a challenge! It becomes a true race of gardener vs nature, and I love it!

Among the many things I like about green stuff, I particularly enjoy the challenge that is the urban garden.
I have borrowed the famous “Dig for Victory” poster as an image for this article as when I moved here I learned about this big London urban gardening experiment that was successful and decided due to the harsh times; the ‘Dig for Victory’ campaign was set up during WWII by the British Ministry of Agriculture. UK citizens were encouraged to grow their own food in times of harsh rationing. Open spaces everywhere were transformed into allotments, from domestic gardens to public parks – even the lawns outside the Tower of London were turned into vegetable patches.  The trend even now is supported by new initiatives.

But how do you start your own little veggie garden in a Patio, in London, often in a condition of partial shade or shade? Not everyone sadly has an allotment, I too am among the ones that do not.

My suggestion is start small and with easy things! Experiment and write down your results.
You can grow many things in different size pots and planters as long as you take care to follow the instructions on the growing of those plants very closely and you apply them as well as you can.

BASIC TIPS:

    1. You can start many plants from seed indoors, usually around March, this will give you a head start and you can bring the plants outside when they are stronger. If you do not feel ready or do not have the space though, there are many nurseries you can buy the small plants at, both online and offline, for example homebase.
    2. In London, the last frost is usually on the very last days of April, if you decide to start the seeds indoors, keep that in mind before putting the small weak plants outside if you don not have a mini green house or something similar.

    3. Learn how to prepare your container and put your plants in it, luckily the RHS has an amazing site that helps out with this with clear and easy instructions that I can summarise here as follows:

      A) Place drainage material in the bottom of the container, such as broken up polystyrene, stones or broken terracotta (crocks). For a container 45cm (18in) deep, a 9cm (3½in) drainage layer is sufficient. Fill the container with compost, leaving room to arrange the plants on the surface or a little for the seeds.

      B) Put the seeds in the pot following the instructions on the seed box (though you can usually sow them just slightly closer as you are putting veggies in pots instead of earth) or in case of a plant, carefully remove the plants from their pots, tease out the roots gently and work more compost around the rootballs. Ensure that the top of the rootball is level with the surface of the compost.

      C) In case of seeds, cover the seeds with soil following instructions on depth, but do not press too much! In case of plants, firm the compost around the plants instead, in both cases water well to settle any air pockets and top up with compost if necessary

      D) Make sure there is a gap of about 2.5cm (1in) between soil level and the top of the container. This will ensure there’s room for the water to soak in

    4. Decide what to plant. And learn as much as possible on that plant so you can take care of it, the ones I have had most success with in my partial shade patio have been:

      – Tomatoes of the “Money Maker variety”
      – Courgettes of most varieties but the “romanesco” seem to have more success
      – Turnips of the “Tokyo Cross” variety
      – Dwarf French beans
      – Spring Onions
      – Onions
      – Garlic
      – Potatoes of the “Charlotte” Variety, I grow these in big bags made of canapa and they do great!
      – Pumpkin of the “Chioggia” quality as you can make the climb and go vertical
      – Cucumbers
      – Strawberries (most varieties)
      – Blueberries (the small plants can be kept in pots and are beautiful too!)

    5. Remember to use fertiliser! Not when the plants are too young so not to burn the roots, but either starting to treat the earth in the winter in preparation for it or waiting that the plants grow a bit, follow the instructions!
    6. Snail treatments: snails in London are voracious little buggers that can really ruin all your hard work! But  please try to avoid using poisons in your garden, even if it is just a patio! For snails choose the amazing NEMASLUG instead! The instructions are really easy and you will probably just need to do 2 applications if you start treating the earth in March. After the nemaslug you might still have some, if you do and you really want to get rid of them you can use Beer traps if all fails and you really need to use chemical options please do not put it in the soil, it is bad for other creatures too, buy a SLUG BELL instead! This will avoid other critters eating the poison as the pellets are hidden in the bell and only slugs get to them, and if you take care of throwing away the dead slugs in the early morning birds will not get to them.


This is the result of my experimenting, failing and overall being super happy trying! There are many more things to write about, and I will go more into depth in future articles but I am certain these tips are a perfect way to start your own little urban vegetable garden! Dig for Victory (your own mostly!)!

This error message is only visible to WordPress admins

Error: No feed found.

Please go to the Instagram Feed settings page to create a feed.

Verified by MonsterInsights