Archives for March 2018

Visiting Lake Como: Suggestions for a week-end adventure.

I grew up part of my childhood on Lake Como. My fathers Italian family comes from the area and my English grandparents on my mothers side chose Lake Como as a home after WWII… it is easy to understand why. It is a beautiful, magical area of north Italy and so close to the comfy Milano that not visiting it when you are in the area is a sin! It is a perfect destination for a week-end or bank holiday as Milan takes very little to reach from most other European airports.

But where should you go and what should you do if you decide to take a week-end adventure there? You have many options but here are the best in my opinion for a  week-end stay! Do visit in late spring, summer and early autumn.

FOR A WEEK-END DO SLEEP IN COMO:
If you will be able only to stay for a week-end choose to sleep in Como, travel time from Milano to Como is 45 mins by train. And you can take boats to other small towns on the lake the following days easily, you do not need a car for many locations. You can either opt for an air bnb in the historic center to feel the vibe of the place,or choose one of the beautiful historic hotels, if you manage to arrive in the morning or early afternoon I suggest you spend this first day shopping in Como and visiting the city, I suggest to eat at the “Ristorante l’antica Riva” on the lungo lago trieste, or head to the “Ristorante il Gatto Nero” at Como/Cernobbio with a cab, it has one of the best views on the lake.

WHERE TO GO THE FOLLOWING DAYS:
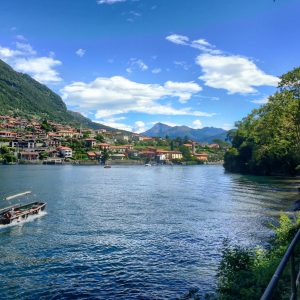
On the second day you have many lovely options, you can take the “Aliscafo” (fast boat), directed to Bellagio and enjoy some hours there with a little bit of shopping and lunch in one of the many caffe’s and restaurants. Beware though that Bellagio is very touristic and prices might be quite high, always check and never go to restaurants that do not put clear prices on their menu.
After Bellagio take the “battello” (slower boat) to Menaggio, enjoy a day there and eat at the “Ristorante di Paolo” visit the small town shop, churches and lovely lake walk, check the times for the return boats to Como and if possible you might enjoy a nice dinner there. Or, if you enjoy Villas, skip Menaggio and head to Tremezzo always by boat from Bellagio to Visit the beautiful “Villa Carlotta” and its world famous botanical gardens, I suggest to eat at the “Ristorante la cucina della Marianna” spend the day in that area before heading back to sleep in Como.

LAST DAY
If you manage to take a late flight to get back home in the evening from Milano, I do suggest you take the early morning train from Como to Milano and visit a little bit this important North Italian city before you leave. Keep in mind though to travel with light luggage if you intend to do so, and always keep a watchful eye on your belongings especially in and out of the train station. The places you can manage to visit in 4-6 hours are the Castello Sforzesco and the Duomo of Milano and the amazing piazza where it stands, I do suggest that if you plan to visit the Duomo or the castle museum, to book tickets in advance! There are many nice places to eat in Milano and the street food is very nice too! But as you are visiting quickly I suggest street food and for this you might want to try a “Panzerotto” at Luini’s or an amazing italian Panino at “Panino Giusto“.

I hope this little guide is useful. Every time I am away too long I miss “my” Lake very much. I tend to spend all my holidays there as it is a place full of hidden treasures to discover and amazingly relaxing if you live in stressfull cities like London!

If you are curious to learn more about lake Como, here are a couple of suggested books!

Bunting, there should always be more bunting!

I love bunting.

To me, nothing says celebration, fun or party quite like bunting. Historically bunting was used as a communication tool and I think it’s still used this way now. You know when you see bunting that a party is nearby. One of the things I love about bunting is its versatility. Bunting is a wonderful beginner project that requires basic skills.

The fabrics, patterns, finish and top binding all work to create different but such pretty effects. Maybe I’m romanticising it but I adore how sheer fabrics dance in the breeze or how bohemian bunting flags cut with pinking shears look.

Literally anything goes with bunting!

When making bulk loads (the most I’ve ever made was 100m for a friends wedding), I don’t tend to sew the individual flags together but go for a pinking sheer finish with the flags attached at the top with the bias. I prefer to finish my bunting with bias binding rather than ribbon. As a general rule I prefer to look of ribbon but I like the clean finish bias binding offers and the way it hides the top seam. Play with the size of your flag triangles and the gaps between the flags to work out the best fit for the space you’re hoping to decorate. The amount of bias I leave on the ends for tying depends on where the garlands will be hung. Between .5 – 1m should be plenty.

The only thing better than general bunting is personalised bunting. Personalised bunting doesn’t have to necessarily mean lettering, it can be personalised by the fabrics you’ve chosen. For my wedding I invited our guests to donate fabric to be made into our bunting. I was blown away by how many people got involved and the memories that were associated with some of the fabric they shared. We lined the aisle with the bunting that represented our family and friends. It was really fun through the day seeing people take photos with ‘their flags’, the mix of colours and patterns was stunning and it was so personal. Because I’m a bunting junky we also had personalised bunting with our names in the background during the ceremony….oh, and there was the bunting with our initials on it across the bar…..and the ‘Mr & Mrs’ that decorated the cake table…. it’s fair to say, I went mental with the bunting at our wedding!

I’ve made several garlands of personalised bunting for friend’s weddings, anniversaries, their kids and the latest garland which prompted this blog is for our nephew’s christening. Benjamin’s bunting is made to match the quilt I made him for Christmas and is double sided. I’ve not made double sided bunting before but I definitely will again, it’s super cute having the two different looks. Another touch I’ve added to bunting for weddings/anniversaries for friends with children is to add their names in the middle flag.

Benjamin’s flags are 17cm x 17 cm with a 5cm gap between flags. Playing around on the computer to select a font that I think compliments the fabric and the right size for the flag, I cut the letters out of fabric I’d backed with a double-sided iron-on adhesive (like bondaweb) – a basic technique for applique. Ironing the double-sided adhesive to the fabric is essential as it, along with sharp scissors, will help keep the fabric lettering from fraying. Don’t forget to pay attention to make sure your letter/fabric are facing the right direction.

Peel off the paper backing from the iron-on adhesive and iron down the lettering to your pre-cut flags. At this point I like to basically stitch the letters down. This bit takes a bit of time but I think it’s worth it. You can finish it however you like but I think personalised bunting looks best sewn together and turned out the right way. I like the crisp and clean finish. After tucking your flags into bias, a quick zip of stitching across the top to attach the flags to the bias and you’re done!

Here is a little montage of the various ones I’ve done for inspiration.

Shhhh… The silent door latch cover for nurseries.

As I wrote in my post about baby bibs, I’ve increasingly been on the look out for baby-related gift ideas. While looking for something practical to gift a new mum, I stumbled on this excellent tutorial for door latch covers by Jess from Practically functional years ago.

This is a beautifully quick project but most importantly it’s highly functional. The latch covers hold the door latch retracted which allows doors to be shut silently while babes are sleeping but also stops toddlers from shutting doors they can’t reopen.

I made some for my friend Charlotte after her first daughter was born. She’s commented a few times over the years how great they are, and recently got in touch ahead of her second daughter arriving to request more. She even asked for some spares to give to other new mums; the ultimate compliment I thought. Despite her only asking for 4, I got a little carried away and made 10.

You can use any fabric for this project. When making these recently, I used some neoprene scraps for the back and a pretty cotton for the top.

The Practically Functional tutorial suggests the size of the latch cover as 3”x4” rectangle, which allows the cover to fit perfectly over the latch on a standard door. The tutorial suggests using hairbands to loop the latch cover over the door handles. I have found them to be the ideal size and an option I wouldn’t naturally have thought of.

These little gems would easily be personalised or jazzed up with a little applique, quilting or cross stitch…..certainly something I’m going to play with for my next baby shower gift!

It’s easy to go batty for bibs!

Increasingly over the last few years I have had the pleasure of making gifts for friends babies. Baby related sewing projects are great fun and if you’re a beginner they’re a great way to practice a range of skills. There are endless tutorials and inspiration for baby projects available online. One of my go-to projects, especially if I’m short on time, is baby bibs.

Baby bibs are so quick and easy to make and individualise. A few years ago we were heading to a BBQ at a friends who had recently had a little boy. Waking up to a relaxing morning, I was stuck by the inspiration to make the wee lad a bib with his name cross-stitched on it. I didn’t have the time or inclination to use waste cloth but instead used gingham fabric for the bib which allowed me to do the cross stitch. Since then, I’ve made a handful and I think they look gorgeous! The first one I made was for Alexandra when she was first born and was so made up recently when I saw a photo of her wearing it as she scoffed cake on her second birthday.

Cami from the Cloth Parcel has written an excellent tutorial for a quilt bib and kindly shares a great template, which is the one I use.

I designed the cross-stitch lettering patterns, so they’re quite simple but I think the lettering looks very effective especially on the gingham. If you are going to design your own, remember to be mindful of the size of your gingham squares to make sure the lettering fits.

For the underside of the bib, you can pretty much use whatever you like – cotton, fleece, towelling, neoprene all work. I used neoprene most recently and it worked a treat.

I have tended to add topstitching around the edge of the bibs because I think it gives a nice finish, but you don’t need to. The Cloth Parcel tutorial shows you how to use bias to finish if that’s more your style.

Hope I’ve inspired you to reimagine the baby bib and personalise this baby essential for a new human in your life.

The Magic of Bobbin Lace

Many people that are passionate about crafts and handmade art, may have stumbled upon videos that show talented artisans making handmade bobbin lace.

This craft is very ancient, bobbins made in bone have been found in Etruscan tombs, in excavation sites in Greece and in many other archeological sites in Europe. It is hard to put a date on this skill, but the modern bobbin lace art can be roughly dated to the XVth century. Some historians think it started in the Flanders area, others according to a report on a sale of “12 bobbins” in 1493 Milan, give the modern bobbin lace Italian origins, it is uncertain and lacemakers get even upset about it 😀 !

Lace was highly sought during and after the renaissance period, both women and men used it to embellish their clothes and home wear, the Flanders area was the first to monetise this art in a advantageous way with lacemakers having contracts to export their works all over Europe. They where then followed in this by Italy and later France, England and Spain.

Bobbin Lace became a status symbol of the wealthy and so remained for many centuries, women and families would save money so to have items embellished by it or entirely made by it in their dowry, home and clothes. A lacemaker once could make a good living for herself and her family, it was an art performed entirely by women. With the industrial revolution and the mechanisation of lace making, this art sadly started to be lost and slipped away. In Italy few locations retain the art and are famous for how it is practiced, the areas of Venice, Como, Cantù, Offida, Scanno, Pescocostanzo. In the U.K.  there is a  “Lace Guild” to my understanding that keeps the art alive. According to the country the lace techniques, threads and methods vary.

And alas lets come to me. I have spent much of my childhood in the Como area, and have early memories of elderly ladies making lace on the typical “Tombolo”, a kind of cylindrical  pillow that they use to set the work upon. I was fascinated by the agility of the women’s hands with the “fuselli” (bobbins). Life went on and I enjoyed other crafts, including tatted lace, but forgot the bobbin lace as all the ladies in the village I spent my summers in had died. Six years ago while walking in the mountains over Menaggio on Lake Como, I ended up eating in a lovely home managed restaurant, in a corner of the room was the “Tombolo”, I fell in love.

By then I was not living in Italy anymore as I had moved to the U.K. with my husband, so going to the school in Cantù was not a possibility. I had to find a teacher. And as many of the last lacemakers are very jealous of their skills, and many more are not alive anymore, it took me 4 years to find a teacher. Meeting lovely Gigliola two years ago, that was willing and still is, to teach me, was a real blessing. This summer I will attend my last lessons with her and then I will be capable of moving to more intricate projects and in many years call myself too, a lacemaker.

It is a satisfying art, not only you create things of intricate beauty that are unique (as every lacemaker has her own style and often her own patterns), but if you thought that knitting is a great form of meditation or mindfulness you will be blown away by bobbin lace. It is an art that has been recently recognised Human Heritage by UNESCO and it is a thread connecting me to all the women before me that practised the same art and kept it alive in history.

If you would like to learn more about Bobbin Lace, here are some sources I can recommend:

MANI DI FATA WEBSITE : It is one of Italy’s best haberdasheries, they send items in all of Europe and have started to give Bobbin Lace lessons again in the last years, thanks to the amazing work of the young gentleman that runs THE LACEMAKER DIARY

There are some nice books you can order at your local library or online on amazon and those are:

This error message is only visible to WordPress admins

Error: No feed found.

Please go to the Instagram Feed settings page to create a feed.

Verified by MonsterInsights