Overlockerphobia and how to deal with it!

Ah! The Overlocker! A tool of mystery, wonder and for many…fear!

A large amount of makers and crafters are afraid of the Serger. And with tales of terror circulating in craft, web, and live groups, who could blame them?

Lets be honest, the industry often does not make these machine approachable to the home makers market, instructions are a little cryptic, threading the thing not exactly a piece of cake.

BUT… the tales of wonder do not cease to fascinate us and bring many to buy a Overlocker, just to leave her to gather dust in a corner after the first couple of attempts.

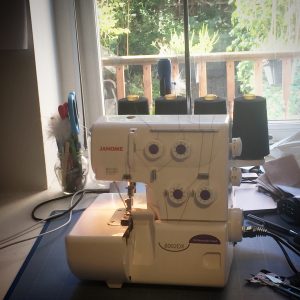
I have overcome my fear and need you all to know that if you leave your serger in a corner you are doing a BIG mistake. I have bought a very simple basic serger the Janome 8002D Basic Overlocker Serger and decided to give it a go!

The first thing you need to learn how to do to “Tame the machine” is to thread it. Janome instructions are not terrible but not an easy challenge either, so I have decided to seek the support of youtube on this, and discovered that there is a video on about any kind of overlocker out there! Best video around is offered by Cathy of Sew&Vac. I watched the video, armed myself with a pair of tweezers and managed all in a decent amount of time, then, I did it again without the video, just to be certain I had memorized it and I must say it was absolutly NOT THAT HARD!

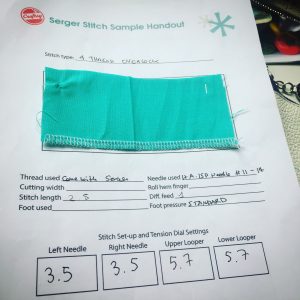
Once I had learned the basics, I had anyway not a clue on the rest, youtube is great, but just did not cover all I could do with an overlocker, I was confused on what I could exactly do, so I decided to go and check craftsy out and took the class “Beginner Serging” with Amy Alan  this was a great decision! Miss Alan is a very good on-line teacher, she covered a lot of stitches, and I triumphantly made some of the projects of the class.

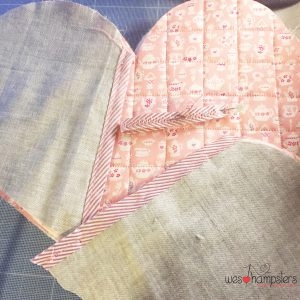
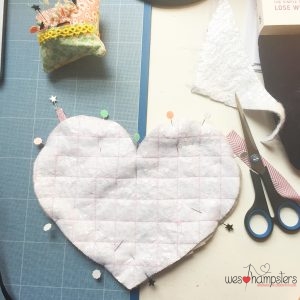
But, one thing is following a class with projects, another is applying it to your real day to day sewing. I was still a little bit fearful, so I decided to take a final step, I wanted to apply what I had learned to a pattern I have used many times and was confident with, and suggest you do the same; I took out my favourite pattern that is Dottie Angel’s Frock  and use the serger to substitute the seams she proposes, using a 3 thread narrow seam and to Hem the arm area and the skirt. The results really pleased me, but what did please me most of all was the time I saved! It took me a little to thread the machine and play around with the numbers, but as I had done my craftsy class and had taken notes of the settings for the different stitches it was super easy! Once that was done the Overlocker saved me hours!

Overcome you Overlockerphobia and start serging with success, it is easy if you know what steps to take to learn from home, I hope this little guide on how to actually start using this machine is helpful!


Making something marvellous out of the discarded.

Confession: I LOVE an up cycle. I also love charity shopping so I’ve always got my eye on giving old treasures a new lease on life. While out on a lady date with my friend Jo, I was inspired to make her a bag from a men’s tweed jacket. After a brief visit to a charity shop where we scored a lovely tweed suit jacket for £10. I made my own pattern which I cut in order to maximise the pockets and finishing of the jacket. In a stroke of genius Jo bought old seatbelts from eBay to use for the strap. The jacket had more than enough fabric needed to make the bag so armed with the seat belt straps, interfacing and closers, I was good to go.

I started by unpicking the bones of the jacket, keeping the pieces as large as possible. The seams and tailoring added a lovely bit of detail that I enjoy. I used the suit lining to line the bag, maximising the internal pockets. Because of the soft nature of the lining fabric and the tweed, I used a medium weight interfacing to provide a bit more integrity to the shape.

Unfortunately, I made this bag before the blog launched so I don’t have any photos of the bag being build. For the front flap I used the flattened fabric from the sleeve, which show cased the adorable sleeve buttons. Aside from being a delectable one-off piece, the tailoring of the jacket made this a fun creation; without having to faff around making pockets.

I hope you’ll agree that this is truly something marvellous out of something discarded and it inspires you to give something old and no longer loved a new lease on life.

I “HEART YOU” oven glove!


I love cooking! And I like nothing more than all the little things that make a kitchen feel like a warm and loved place in my home.
So this little pattern is lovely to make for your own house or as a gift, and really quick too! I hope you will enjoy it!

What you need

  • 2 or 4 Fat quarters that coordinate well together
  • Insulated wadding
  • Thread
  • Scissors
  • Bias Binding
  • Pattern

Download the pattern and print the same sheet twice, From the first sheet cut out the whole heart, from the second sheet the two half hearts.


Place the full heart on top of the insulated wadding pin it down nicely, cut out a wadding heart, repeat and make another one so that you now have two insulated wadding hearts. Now do the same for the fabric you want for the front and the back of the heart, you should then have two full heart fabric hearts. With an erasable fabric pen, take the fabric heart you want to have visible on the outside and trace 2.5 cm squares. Pin this traced heart to the 1 of insulated wadding heart sheets and sew the lines to create a “patchwork” effect.


Cut out the half hearts from the pattern, take one of the two half hearts and follow the same procedure you did for the first heart with 2 pieces of fabric and 1 of wadding, but there is no need to “patchwork” these unless you really want to!
Apply bias binding to the straight edges of the heart halves, and prepare some to be used as a small hanging fabric hook, roughly 4 cm will be more than sufficient, sew the sides close to prepare it


Then make a small layered cake, from the bottom to the top it should be layered and pinned as follows:
1) The single full heart shaped insulated wadding left ,
2) The patch work heart,
4) The fabric hook pinned on the side
5) The flaps
6) at the very top, what should become the back of the heart


Sew this little cake together with a 1 cm allowance, but do not close the heart completely, you need to turn it inside out! Before doing so though, make small cuts along the edge of the excess fabric. You only need to close the little hole in the heart, I suggest using a Ladder stitch to do so, as it will be invisible! And voilà! Your bellissimo Heart shaped oven Glove is done!

If you are wondering where to get a Fabric erasable pen, this is the one I use!


Cleanliness is next to happiness

Sorry to those of you who only read our blog for the pretty pictures of our creations, this is the blog equivalent of the safety warning at the start of a holiday flight – a bit of necessary admin before the relaxation can commence. Sewing machine maintenance isn’t the sexiest of topics but it is really important.

When truly inspired I can thrash my sewing machine, forgetting that every now and then it needs a little love too. All fabrics leave lint and fluff in the machinery of sewing machines. These collections of lint and fluff will cause your sewing machine to get sluggish. Sewing machine mechanisms are lubricated, allowing the belts, plates and leavers inside the machine to move freely. Over time these mechanisms can dry out. If you use your sewing machine a lot you’ll know when it’s not running at its best and/or making funny noises; a sure sign it needs a good clean.

The key to keeping your sewing machine stitching along healthily is oiling it and cleaning the fluff out periodically. Advice for cleaning sewing machines is universal and basic. There are a plethora of videos available on YouTubeand generic tutorials. I would recommend the first time you clean your machine that you look for a video about your specific machine model to help build your confidence with tools. Sewing machine oil is specific, don’t use domestic cooking oil to lubricate your machine. Compressed air features in a lot of tutorials and videos as a recommended to get fluff out of small spaces in your machine.

I personally keep a soft paintbrush near my machine and give the boobin holder a little dust off when I sit down to use my machine. I also have a reminder set on my phone to oil my machine once a month, which I ignore if I’ve not used it much. While cleaning and oiling your sewing machine won’t fix all issues but it will help keep your sewing machine running smoothly.

I promise to stick to more creative sharing in my next posts but having cleaned two sewing machines this weekend, it seemed timely to remind others of the importance of taking a few minutes to look after our beloved machines.

This error message is only visible to WordPress admins

Error: No feed found.

Please go to the Instagram Feed settings page to create a feed.

Verified by MonsterInsights